The season was intermittently rainy or dry as I began to take interest in weather. After getting stuck with “If-this-than-that” (IFTTT) for multiple location feeds of weather, I found out that I wasn’t alone, a geek hit the same wall, yet bringing another automation forgery: Nebri OS, an event-driven development platform based-on writing rules in Python. Without despise, eventually I still use IFTTT on the other end to send weather alert to my smartwatch again.
A quick adaptation of Nebri’s straightforward blog post is to first shortlist rain related codes into 15 of them and changing from forecast to latest measurement instead. Bridging Nebri and my smartwatch are Twitter and IFTTT recipe–the watch merely mirrored my phone, you don’t need it actually. Why (again) Twitter? Well, rather than the “then that” side–the watch enabler, the “if this” side of IFTTT for Twitter recipes is quite powerful given so many tweet filtering options.
Key-value pairs as trigger for event driven Nebri OS workflow
If this than that recipes alert for Commuter Train trouble
The ingredient is tweet, Twitter Search use case is no longer just sentiment analysis, its function extends to alert, even close to real time–I’m pretty optimistic given the number of Commuter Line users joining the conversation. Now, the no-code part of our recipe, a Twitter search query, that is
Mobile NAS sounds like an idea worth waiting for to run on my mini Raspberry Pi Model A. Unfortunately, it only took me a while, before abandoning it. I’ve waited since writing about Raspberry Pi USB problem, that is to finally cut the backfeeding power line from the el cheapo powered USB hub. There comes new problem afterward, my “big storage” ―a Seagate® Backup Plus Slim Portable Drive, shipped with no bulky power supply line― can’t be mounted. Silence soon follows rotating motor sound a while after plugging-in. I’ve tried both ext3 and NTFS (using ntfs-3g) without luck. Later, as benchmark whether it is USB power in question, I try to connect the same set of el cheapo USB hub plus external power to laptop, and it works, leaving me stranded with other issue (is it USB 3.0? 256MB of the Model A? Anything?). I must say that it isn’t completely not-working as the USB hub set can mount with USB to IDE converter and my old internal hard disk (noting that there shouldn’t be similar power issue this way). If only it weren’t for the AC power adapter and large size, this is Mobile NAS; beats me.
Battery power bank, WiFi USB stick, and thumb drive
I then turn away to motor-less small storage, a 32 Gigs USB thumb drive so I can move on to other concern: on-the-fly encryption. Hence, I follow instructions to install True Crypt on Raspberry Pi. After unpacking of wxWidgets-2.8.12.tar.gz and TrueCrypt 7.1a Source.tar.gz in place, putting header files from pkcs-11-cryptoki2.20, and then install libfuse-dev, the following make will require long time:
$ exportPKCS11_INC=/usr/local/src/truecrypt/pkcs/
$ makeNOGUI=1WX_ROOT=/usr/src/wxWidgets wxbuild
Configuring wxWidgets library...
Building wxWidgets library...
/usr/src/wxWidgets/src/common/string.cpp:84:39: warning: ‘wxEmptyString’ initialized and declared ‘extern’ [enabled by default]
What about instantiating any m x n matrix keypad by a Python class? Raspberry Pi takes me to learn how to build a Python class for the first time while expanding my initial WiringPi-based matrix keypad into a derivative work.
A matrix keypad instance is defined by:
Actual GPIO pins used forming the row and column of the m x n matrix
Individual character in-use as symbol for each button
to print the character being pressed. Some examples pushed to my github explains how the above keyPad, row, and col are defined to scan-read pressed button of 2×2, 2×3, and 4×3 matrix keypads .
Illustration of any m-by-n matrix: 4x3, 2x2, and 2x3 keypad with different button symbols & GPIO combinations
I used deprecated Wiring-Pi Python (they already moved to 2.x version) without problem. However, you’ll fail building from latest commit and must use combination of older commits as described by my updated part of an old-post. By the way, there’s I/O expander support for WiringPi2-Python which is good, considering:
GPIO is expensive and for the sake of a keypad, you should not spend all.
Web Proxy Autodiscovery Protocol (WPAD) protocol draft expired in 1999, but today’s major browsers are still supporting it as will be shown later. Two types of DHCP server are tested to describe how WPAD behaves prior to/after starting up the internet browser. To be clear, uploaded packet captures are shared in CloudShark. DNS and domain resolution is a must for the WPAD to work when MS Windows Internet Options configured to “Automatically detect settings” (for IE 6 in Windows XP desktop, IE 8 in Windows 7 desktop, and Google Chrome) or Firefox to “Auto-detect proxy settings for this network“. As simplest DNS setting should work, this post will not cover its configuration.
Low level view of WPAD interactions involving DHCP, DNS, and HTTP servers in packet capture (shared in CloudShark)
In DHCP discovery-offer-request-acknowledgement cycle, WPAD information is given in option 252 (check section 4.4.1 of the draft). I used dhcpd3-server package in Ubuntu and setup /ip dhcp-server option add code=252 ... in Mikrotik 5.20 for example variations. For both, trailing “\n” are added to wpad.dat URL value as most howtos recommend.
"http://wpad.some-company.net/wpad.dat\n"
In the above example value, wpad.dat is hosted in Apache2 HTTP server resolvable by the DNS to the actual host IP of wpad.some-company.net. When the client use all DHCP offered items, it gets domain name (option 15) some-company.net besides other things e.g. router (option 3), DNS (option 6), etc. In a case where the client use its own DNS (only use IP from DHCP), WPAD likely won’t work unless it is able to resolve the example some-company.net or wpad.some-company.net. Following the tail of /var/log/apache2/access.log, successful wpad.dat request will appear as
After installing squid3 from repository, Ubuntu will place the init in upstart style (instead of /etc/rc*.d/ or /etc/init.d/ style used to maintain backward compatibility to legacy System-V init). The upstart job is placed in /etc/init/squid3.conf with default runlevel (2,3,4 or 5) to start the instance during reboot and relevant start/stop command using service:
$ sudo service squid3 {start|stop|restart}
To specify what to run, an upstartmust haveexec or script stanza. When the goal is to start two or more (multiple) instances of squid3, exec is meant to replace existing process image of /usr/sbin/squid3 executable, therefore will not start two instances.
Multiple squid3 instances started via upstart exec
As workaround we can have symbolic link to squid3 executable instead and add new upstart job configuration with exec call to the link. I need two instances running in the same machine due to the implementation design where the fist instance is HTTP proxy cache while the second one is accelerator/interceptor (reverse proxy) that serves default landing page telling user to use proxy (and how to do that). Hence, for the second instance I add:
lrwxrwxrwx 1 root root 6 May 3 09:25/usr/sbin/squid3ins2 -> squid3
-rw-r--r--1 root root 1156 May 613:30/etc/init/squid3ins2.conf
and for the first instance I add:
-rw-r--r--1 root root 298 May 310:13/etc/init/squid3.override
squid3ins2 is our link and /etc/init/squid3ins2.conf contains exec call to it to run second squid3. For the first instance I choose to write an override (/etc/init/squid3.override) so that the original job configuration file is left intact. For the complete content of all files check my github v1.1 of the Squid integration. There, in details you’ll also find how both instances PID, log, etc. are differentiated by each instance config via the following directives:
By booting from MMC/SD card, you can bring up your BeagleBoard-xM or DevKit8500D (both are ARMv7). It is the only way for the xM (microSD card to be exact), while with DevKit, you have the option to flash it to the board for NAND-boot once you’re sure that it works with SD card. eLinux wiki has some sections about the card setup e.g. Debian setup, how to start from U-boot prompt, etc.
In the Debian example, the wiki introduced NetInstall. Later I find out the mk_mmc.sh script shown there to be useful for (1) duplicating and (2) restoring working Linux backup to new or corrupted MMC/SD card. I break down that Robert C. Nelson’s mk_mmc.sh script at GitHub to small routines for setting up the card.
Typical boot-rootfs partitions of SD card to boot ARM-Linux boards
It’s an elegant script automating the process of preparing SD card for embedded Linux, but requires large downloading on the run (mostly root file system and then U-Boot binaries and loader config). Duplicating/restoring means we already have those and probably only need to do elementary process rather than full card preparation. Below are some processes that can be repeatedly used.
USB modem these days are plug-and-play as CD-ROM first allowing driver and internet dialer application installations and then as modem afterwards. This Windows-behavior is handled by USB_ModeSwitch in Linux. Likely three years ago we did eject and other driver attachment by writing udev rules.
Now it’s almost automatically attached as modem after insertion and people have been contributing to list of device-and-target device after mode-switching (find it as /usr/share/usb_modeswitch/configPack.tar.gz). At least for Raspberry Pi (RPi), I have one device list from August 2012 when playing around with XBian 0.8.3 and one from May 2012 in when using Raspbian Wheezy (2012-08-16).
Huawei E220 requires no mode-switch from vendor-product ID 12d1:1003 to function as modem
There is still wrapper for udev in /lib/udev/rules.d/40-usb_modeswitch.rule and my Huawei E153 HSDPA stick recognized and switched successfully as shown:
usb_modeswitch: switching device 12d1:1446 on 001/005
...
logger: usb_modeswitch: switched to 12d1:14ac on 001/006
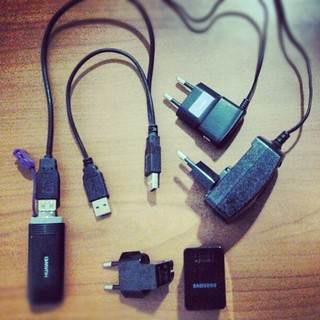
USB problem is the first thing to arise with Raspberry Pi when plugging-in peripherals. This isn’t exclusive though, learning that my Linux laptop also has it and the higher ARM architecture, BeagleBoard-xM, also experiences the same issue sometime. But with Raspberry Pi (RPi) in the universe of many viable USB device options, you’ll definitely need to double its popular credit card-sized form to have powered USB-hub docked next to it, although Y-cable with separate power assistant injecting the USB device directly is sometime adequate.
Y-cable for USB modem stick & various current rating-AC power adapters for smartphone/tablet to go with Raspberry Pi
eLinux Wiki lists market available USB-hubs reported to work. A decent brand (that will cost you) qualifies:
Doesn’t leak power back to RPi via USB port (check this by unplugging the main power, then check the red LED indicator) as this will interfere with the reboot command (physical state vs software).
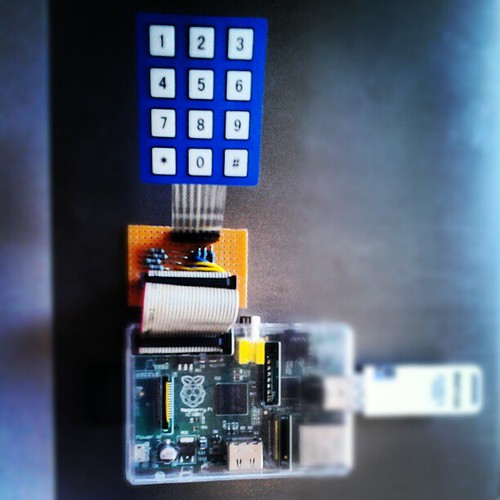
Membrane matrix keypad using GPIO as Raspberry Pi input has been my goal since WiringPi deployed in the first place. To begin with, GPIO hacking was initially started with some important basics (see previous post). Without external system (other interfacing chip), the 3×4 membrane keypad reserved all seven GPIO pins plus one pin used for LED indicating successful reading of pressed key.
My idea of having the keypad is to make alternative input available under no keyboard presence nor shell access. List of things I can think of for instances, pressed key “0″ will make the Raspberry Pi (RPi) dial GPRS to a specific ISP and act as router to the USB WiFi stick, pressed key “7″ will convert it to a router that will bridge the ethernet to WiFi, etc. In short, those key readings will invoke subsequent scripts to run inside RPi.
The physical connection schematic drawings and code are gitified (visit v1.2 of the project on gitHub). A nice animated image on how the buttons connect pins forming a matrix can be found in hackyourmind.org.
Matrix keypad: alternative quick input for Raspberry Pi to start certain command
 44 views


![Mobile NAS [Raspberry Pi hack] by aqila_rifti, on Flickr](https://farm6.staticflickr.com/5193/14317107955_73226c6432_n.jpg "Mobile NAS [Raspberry Pi hack] by aqila_rifti, on Flickr")

")