Duplicate/Restore ARM Linux Image to MMC/SD Card (BeagleBoard and DevKit ARM)
By booting from MMC/SD card, you can bring up your BeagleBoard-xM or DevKit8500D (both are ARMv7). It is the only way for the xM (microSD card to be exact), while with DevKit, you have the option to flash it to the board for NAND-boot once you’re sure that it works with SD card. eLinux wiki has some sections about the card setup e.g. Debian setup, how to start from U-boot prompt, etc.
In the Debian example, the wiki introduced NetInstall. Later I find out the mk_mmc.sh script shown there to be useful for (1) duplicating and (2) restoring working Linux backup to new or corrupted MMC/SD card. I break down that Robert C. Nelson’s mk_mmc.sh script at GitHub to small routines for setting up the card.

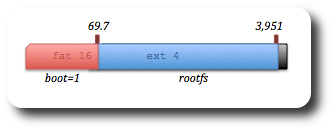
Typical boot-rootfs partitions of SD card to boot ARM-Linux boards
It’s an elegant script automating the process of preparing SD card for embedded Linux, but requires large downloading on the run (mostly root file system and then U-Boot binaries and loader config). Duplicating/restoring means we already have those and probably only need to do elementary process rather than full card preparation. Below are some processes that can be repeatedly used.
The tools to work with are common in Linux distribution (I used Ubuntu) and require root privilege. The script checked for fdisk and parted installed. My versions are
$ fdisk -v
fdisk (util-linux-ng 2.17.2)
$ parted -v
parted (GNU parted) 2.2
Originally mk_mmc.sh will exit If “GNU Fdisk” found instead. Also for the above parted version, “--align cylinder” argument will be used.
Setting up two partitions which are the boot image (FAT 16) and root file system (ext4). The SD card plugged in through USB card reader found as /dev/sdb in this example (we’re formatting be sure of this!). If you plug MMC card to laptop slot, it may be found as /dev/mmcblk0.
- Format card into a single disk
- Create the boot partition (allocating 64MB)
- Flag it as
boot - Create the root file system by first determining space left after the first partition
- Format
bootandrootfsaccording to each file system type with those naming also. They’re already accessible as/dev/sdb1and/dev/sdb2(previously didn’t exist) or relevant/dev/mmcblk0p(some index). - Finally we have something like the output of
partedbelow
$ parted --script /dev/sdb mklabel msdos
$ fdisk -l /dev/sdb
$ fdisk /dev/sdb << END
n
p
1
1
+64M
t
e
p
w
END
then make sure it’s done.
$ sync$ parted --script /dev/sdb set 1 boot on
$ END_BOOT=$(LC_ALL=C parted -s /dev/sdb unit mb print free | grep primary | awk '{print $3}' | cut -d "M" -f1)
$ echo $END_BOOT
69.7
$ END_DEVICE=$(LC_ALL=C parted -s /dev/sdb unit mb print free | grep Free | tail -n 1 | awk '{print $2}' | cut -d "M" -f1)
$ echo $END_DEVICE
3951
In this case 4GB SD card is used and the above calculation will stretch space left from 69.7 to 3951 of as rootfs partition.
$ parted --script --align cylinder /dev/sdb mkpart primary ext4 $END_BOOT $END_DEVICE
$ mkfs.vfat -F 16 /dev/sdb1 -n boot
$ mkfs.ext4 /dev/sdb2 -L rootfs
$ LC_ALL=C parted -s /dev/sdb unit mb print free
Model: HUAWEI MMC Storage (scsi)
Disk /dev/sdb: 4023MB
Sector size (logical/physical): 512B/512B
Partition Table: msdos

Number  Start   End     Size    Type     File system  Flags
 1      0.03MB  70.9MB  70.8MB  primary  fat16        boot, lba
        70.9MB  4023MB  3953MB           Free Space
(yes I used Huawei modem as the microSD card reader)
For the boot partition content we can simply copy-paste the backup files, while for rootfs normally compressed file (preserving path information) is used for backup. Restore this by mounting rootfs and then unpacking the file (again /dev/sdb2 in this case).
[root@host]$ mkdir /media/rootfs
[root@host]$ mount -t ext4 /dev/sdb2 /media/rootfs
[root@host]$ pv armel-rootfs-201110131018.tar | sudo tar --numeric-owner --preserve-permissions -xf - -C /media/rootfs
Below is an example of how to backup rootfs from the mounted SD card (/media/rootfs).
[root@host]$ cd /media/rootfs
[root@host]$ /media/rootfs# tar --numeric-owner --preserve-permissions -cvf /home/arif/Documents/arm-linux/ubuntu/rootstock-rootfs/armel-rootfs-201202141421.tar ./*
(Check my other post related to creating rootfs)
mk_mmc.sh also offers optional swap creation. It is a “file” inside rootfs partition created by
[root@host]$ dd if=/dev/zero of=/media/rootfs/SWAP.swap bs=1M count=250
[root@host]$ mkswap /media/rootfs/SWAP.swap
(the above will create 262MB swap inside rootfs SD card currently mounted to /media/rootfs of the laptop)
It will be mounted as swap by the ARM-Linux board via fstab setting configured below.
[root@host]$ echo "/SWAP.swap none swap sw 0 0" >> /media/rootfs/etc/fstab
Synchronize and safely remove the card
[root@host]$ sync
[root@host]$ umount /media/rootfs
About
+Arif Kusbandono
Recently
Et Cetera
© logIt. Powered by WordPress using the DePo Skinny Tweaked Theme.